Intro
Welcome to a little explanation of what I’ve learned so far in wifi exploitation and defense. Most of the attacks are found within Wifite, a collection of Python scripts that make it very easy carry out attacks against most commonly used 802.11 encryption protocols on private and public access points. There are other attacks that are more disruptive not necessarily with a rhyme or reason behind them, such as using MDK3 to disconnect users constantly from an access point. Then we move on to a method of connecting to open access points that require a portal for authentication. Instead, we use a tool to impersonate a connected client and bypass this restriction. Then we have some scouting tools like Wigle.net and Kismet to help find certain access points and even detect attacks. If we have time there is even methods for tracking wifi enabled devices that show how easy it is to track people. Hopefully you learn something new to help improve your network security, cheat the system, and lessen the effectiveness of the privacy goblins we carry in our pockets everyday.
Software needed
Installation of Kali would be the easiest and most straightforward setup to get going. This tutorial covers tools that can be found installed by default in Kali, so using that system is going to make your life a lot easier. Next would be a Kali VM with a usb wifi adapter plugged in.
If you can’t do any of those options or have a linux distro you can’t be without, install this package list:
sudo apt update
sudo apt install kismet aircrack-ng mdk3 tcpdump macchanger tcpdump -y
git clone https://github.com/derv82/wifite2.git
Hardware needed
In addition to the software, a simple 2.4ghz wireless adapter capable of injecting packets & monitor mode is necessary for wifi fun. These are some that I’ve used with great results and they are as cheap as $10.
Notice: The APs to attack are labeled with the prefix DC509, we are not giving permission to attack any other points.
Monitor Mode
Probably the most important step is to enable monitor mode on your wireless adapter. Wifite enables this automatically but for the other tools it’s important to know how to do it. First, find your adapter name with ifconfig. Disable the adapter via (assuming wlan0)ifconfig wlan0 down. Then configure airmon-ng to start on that device: sudo airmon-ng start wlan0. Finally, bring the newly configured adapter back up with ifconfig again: ifconfig wlan0mon up. If you want to remove monitor mode to access wifi normally, just disable airmon-ng sudo airmon-ng stop wlan0mon
Attacks
Wifite
Wifite will be our go-to tool for retrieving access point passwords.
WEP
WEP cracking with it is something trivial, but for some reason not so much when setting up on our test router using ddwrt. The router takes the configuration but clients cannot connect to it. So for this, I’m going to just go over the theory of this attack. First we boot up wifite and run it against DC509-1:
wifite -WEP -i wlan0mon
After running this for a bit near a WEP point it will start to populate in the list. Quit the scan using ctrl+c and enter the number associated with the target access point. Wifite will then start working through the available attack scripts in its toolbox. With a weak password and a client connected to the access point you’ll catch enough IV’s (initialization vectors) to start cracking. In our lab test we set up an access point using a password from the rockyou wordlist and cracked it in seconds.
WPA/2
Wifite can also be used to target WPA/2 encryption:
wifite --wpa -i wlan0mon
Wifite will start looking for access points that are secured using WPA/2. Just select the number next to the AP as before and wifite will start working through the list of attacks.
WPA2 without clients
This last attack for WPA2 is nice because it’s pretty stealthy. No clients need to be disconnected from the access point for it to work. Apparently, Wifite2 comes with pmkid tools built in. This used to be a pain in the ass but now all you have to do is run the previous command with these tools installed. If it’s gonna be automated this much I don’t see why the pmkid tools aren’t packaged too. The hcxdump tool gets the data, hcxtools converts it to a format hashcat can read.
git clone https://github.com/ZerBea/hcxdumptool.git
git clone https://github.com/ZerBea/hcxtools.git
Disconnecting clients
MDK3 is a tool we can use to perform several different attacks as well. If we run the following command we can constantly disconnect clients. (Make sure your adapter is in monitor mode) Pretty fun!
sudo mdk3 wlan0 d
Finding targets
Kismet
Kismet describes itself as “a wireless network and device detector, sniffer, wardriving tool, and WIDS (wireless intrusion detection) framework.”
It’s awesome at detecting common attacks, but even better at displaying information about wireless devices and networks. In our case we will use it to discover hidden access points and view connected devices to those access points.
Using kismet, we will look at the access points available around us. The more powerful our wireless adapter & antenna, the more data we will capture in the air. (Quality Yagi antennas tailored to 802.11 are awesome)
Notice: If your having trouble with Kismet, this Discord Server is the quickest way to get help and the community is very helpful and welcoming.
These tools don’t start monitor mode on our adapter as nicely as wifite does, so we have to set it up manually.
airodump -ng start wlan0
Replace wlan0 with your interface adapter
Warning: Check your adapter name with ifconfig Also, you might need to bring your interface down first, run airmon-ng, then start it back up for it to work properly. Airmon-ng renames monitor mode interfaces by appending “mon” to the original interface name.
ifconfig wlan0 down
airmon-ng start wlan0
ifconfig wlan0mon up
Running Kismet is as easy as typing kismet -i wlan0mon
This starts the webserver automatically and is located at 127.0.0.1:2501 just put this into your browser.
We can check our login creds with:
cat ~username/.kismet/kismet_httpd.conf
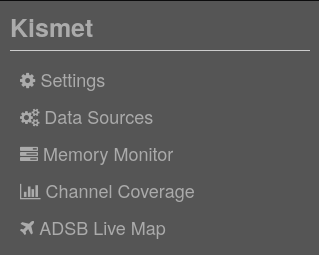
Once logged in, select the three-lined menu button in the upper left.
Then select “Data Sources”.
It may take a moment for all interfaces to show up. Click on the “Available Interface” dropdown for your device. Select “Enable Source”.
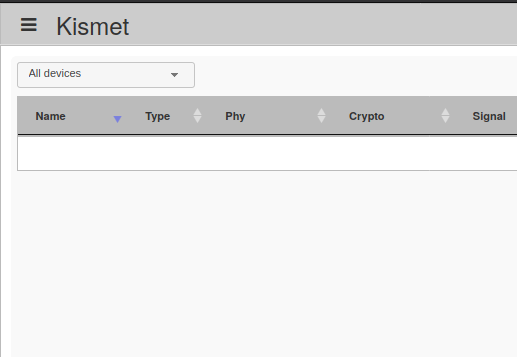
Going back to Kismet’s main page, because we are in monitor mode, we can see packets going from other access points, not just the ones sent from the wireless point we are connected to normally. The data from users to the AP is still encrypted, but we can see the devices connected to the points, what channels they broadcast on, what the mac address for that AP is and other metadata. The cool thing about this is we can see “hidden” access points as well.
Bypassing MAC address filtering & avoiding hotel portals
Macchanger is a utility to manipulate the mac address of your network adapter. Using a mac address found through Kismet (found below) we can borrow that same address, sidestepping both captive portals and filters based on mac addresses. It can do a lot more too, such as setting random or permanent macs.
macchanger --mac XX:XX:XX:XX:XX:XX wlan0
Probesniffer
All 802.11 devices need a way to find an access point they have previously connected to. Usually, this is done with probe requests. Your devices yell out in public a last known SSID it has associated with. If that matches with an AP nearby, we get a response confirming and start the handshake process to connect with it. When our device says this in public, its like yelling a home address, especially when that SSID has been recorded within Wigle’s database. Try the following python script. While it may be old, its the best I’ve found for recording probe requests plus it saves them into a nicely organized Sqlite file we can query later or reference in another script. You will need to manually place your adapter into monitor mode.
sudo apt-get update && sudo apt-get install python3 python3-pip tshark -y
git clone https://github.com/xdavidhu/probeSniffer
cd probeSniffer/
python3 -m pip install -r requirements.txt
sudo python3 probeSniffer.py wlan0mon
Probesniffer hasn’t been updated in a long time, so if it isn’t working a simple dump is better than nothing. Pipe this command to a file to save it for later. For this you’ll need tcpdump.
tcpdump -i wlan0 -e -s 256 type mgt subtype probe-resp or subtype probe-req
Notice: You can also run these in Wireshark using the same syntax, tcpdump is just nicer on system resources.
Wigle.net
Locating vulnerable access points is pretty easy when we can leverage the power of crowd data collection. Wigle.net is a service that collects information about access points and adds them to a database we can search and perform queries on. Tools to build this awesome data service can be as simple as an Android device, to an all-out war-driving rig. I’ve build these setups in the past using a gps module, raspberry pi, Alfa card, and a portable battery pack. It’s not nearly as easy to get data into Wigle this way, but you do have more control over what information gets to them, such as your (super basic) device information. Android devices are great for this because they come with everything and installation is quick from the Google Play Store.
Anyways, jump onto the site and register for an account. Once that is done, login and go to “View” in the top menu. Then “Advanced Search”. Finally, lets search for all WEP “encryption status” APs in Chicago. Stale information isn’t going to help us as most of the WEP points are gone nowadays, so lets filter by the last year by entering the “last observed” info. Easy, right?
Notice: The time/date format is: YYYYMMDDHHMMSS
Boom, these are all the extremely vulnerable access points that MAY still exist and a simple Wigle scan would update the database and possibly confirm this.
That’s it for now, thanks for stopping by!